 You are probably thinking, "What does this box have to do with smocked socks?" Well, not a thing, but I bought this box a few weeks ago to store all my embroidery floss in. It has a flip top lid that's magnetized. I just had to share this "pretty" with everyone. Now I wish I could have found a pink box, but since a pink one wasn't available, purple was my second choice. Not a bad choice if I do say so.
Okay, here we go on the smocked socks:
 1. Turn socks inside out to mark the with a water soluable marker. I've marked little dots to show where the fold line is at. You can just make out the line, but I like to mark this as I don't want to get too close to this line of the cuff with my smocking. I want the smocking to be in the middle of the fold line and the bottom of the cuff once you're done.
1. Turn socks inside out to mark the with a water soluable marker. I've marked little dots to show where the fold line is at. You can just make out the line, but I like to mark this as I don't want to get too close to this line of the cuff with my smocking. I want the smocking to be in the middle of the fold line and the bottom of the cuff once you're done. 2. Using a 1" acrylic ruler (find in the quilting dept of fabric store), measure down 3/8" from your fold line and draw a line all the way across sock cuff.
 3. You're now wondering why the ruffled sock only has two lines and the purple sock has 3 lines. For beginners I've marked half-space lines 3/16" apart. This will help you to learn the placement of your stitches. One the ruffled sock, I've marked lines 3/8" apart, which are the measurements of a whole space. You can choose to do two or three lines. Both are correct, but very beginner's may want to use 3/16" spacing for their lines.
 4. Continue marking lines all around the cuff. Next we'll talk a little bit about how to get the threads apart from the 6 strands they come in.
 5. First, cut a length of floss. I like to use about 24". If using silk floss, use a shorter length. This will prevent it from getting too fuzzy and worn looking. A length of 24" on cotton floss will allow you to go all the way around most sock cuffs in one shot. Next, grasp the end of the floss with index and thumb. Lightly pounce on the end with other hand. This will open up the floss and allow you to grab ONE strand and then pull. Don't let go with you first hand. Once you've got the first thread out, set it aside and straighten out the remaining floss and do the same thing all over again. Then put the two strands together and this is what you will then smock with.
Many people will just pull apart and let it twirl to unwind. I don't like this because you can get knots in your floss. This happens so easily, you don't want to help it along.
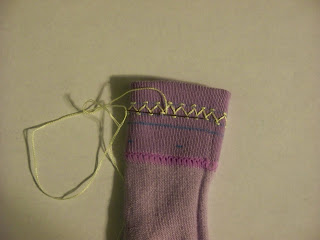
 You will see in this pic that I am left-handed. So anyone who is also, you will get all the smocking instructions in left-handed format.
 6. If you want a close up, just click on the pic and it should enlarge for you. The ribs on the sock kind of makes a little V, please count this as one pleat. You may need to stretch the cuff a little to see the "pleat". To start, bring your needle up between "pleats". We are going to begin with and "up" cable. Go over one "pleat" the left or right and take a bite with your needle. Notice the floss is laying up (creating a "hill"). And for everyone who is experienced with smocking, you don't need to count pleats on socks. There are always the number.
 7. Pull the thread until it just barely touches the sock. Don't pull too much over your stitch will be distorted and become hidden in the sock. On socks, I've found I have to keep the tension on the socks very loose. The next pic shows what will happen if you pull too much.
 If this happens, just ease the tip of your needle under the stitch and pull on it a little to loosen it up.
 8. Next, go down to the middle line you drew. In the next "pleat" over take another stitch. The needle is paralel to this line. You will have to make sure that your thread is out of your way. It likes to lay in the way of your stitching when doing any kind of trellis stitch. This kind we are doing on the socks it called a "baby wave". And of course, we are doing baby socks :).
 9. The next stitch to make is an "under" cable. Notice the thread is going under (creating a "valley").
10. Go back up to the top line and make an "up" cable. You have just completed you first baby wave. Yeah for you!!!!!
Now go back down to the second line and do an under cable. It will create a zigzig pattern on the cuff.
Now go back down to the second line and do an under cable. It will create a zigzig pattern on the cuff.
 11. When you get all the way around to where you made your first "up" cable; poke the needle between the first two "pleats" and you have now completed your first row of smocking!!!!! Be proud of yourself.
Now on to the second row.
 12. Poke the needle the side and just below a cable stitch. You will notice the thread will trail on the back of the cuff. If you didn't have enough thread to go all the way around the cuff; that's okay. I like to stop between pleats and start on the side of a pleat.
 13. Next, make an "up" cable. Then, go down to the bottom line and stitch a "down" cable. All you are doing is repeating the previous row you just made. You will see that a "diamond" shape is created.
 14. Finish up the same way you did on pic #11. Tie off on the back of the smocking with a knot.
 15. Rinse your socks in cool water to get rid of the marker lines. Add a cute little bow, rosebud, button or bullion rose. For a bullion, I will be doing a tutorial with the bonnet Lesson 2. Next week I will be doing Lesson 1 of the Smocked Bonnet.
 For those of you who decided to only draw two lines on the cuff. You still do the stitches like you would in the previous instructions. You just don't have that middle line. On the white sock, you can see the "pleats" a little easier.
Supplies:
12. Poke the needle the side and just below a cable stitch. You will notice the thread will trail on the back of the cuff. If you didn't have enough thread to go all the way around the cuff; that's okay. I like to stop between pleats and start on the side of a pleat. 13. Next, make an "up" cable. Then, go down to the bottom line and stitch a "down" cable. All you are doing is repeating the previous row you just made. You will see that a "diamond" shape is created.14. Finish up the same way you did on pic #11. Tie off on the back of the smocking with a knot. 15. Rinse your socks in cool water to get rid of the marker lines. Add a cute little bow, rosebud, button or bullion rose. For a bullion, I will be doing a tutorial with the bonnet Lesson 2. Next week I will be doing Lesson 1 of the Smocked Bonnet.
 For those of you who decided to only draw two lines on the cuff. You still do the stitches like you would in the previous instructions. You just don't have that middle line. On the white sock, you can see the "pleats" a little easier.
For those of you who are wanting to smock-a-long with me on a Bishop dress; I'll be doing that after the Bonnet lessons. Here's a shopping list for supplies:
1 ready to smock bishop dress (if you want to order a pre-pleated dress, go to the Martha Pullen company. The dresses are very reasonably priced.)
The pattern I chose to do is from issue 92 of Australian Smocking and Embroidery. It comes sizes 6 to 18 mos. Due to copyright laws I will not post the actual smock plate, but I will show in pics the stitches used.
Supplies:
Milliner needles (multi size package)
Embroidery or small sewing scissors
Embroidery floss colors: DMC #’s, 1 skein each (you may choose something other than pinks; just pick 3 graduated colors for the roses in light, medium and dark shade)
B5200 – Bright White 524 – Lt. sage green 818 – Lt. Pink
776 – Med. Pink 150 - Berry
Optional: needle threader
Sewing thread to match fabric, Mettler Metrosene suggested
Sewing machine with instruction manuel
Fine silk pins, pin cushion
(5 ) 3/8” buttons
Size 2 snap
Wonder Tape
Size 10 or 12 needle for sewing machine
Bobbin loaded with sewing thread
Sewing gauge
Seam ripper
Water soluble pen
Interfacing: very lightweight (2) 7/8” x length of button band
1 comment:
Yhao private label knitwear manufacturer develops new production techniques and only use the best materials. Our laboratories are continually looking for new solutions to create excellent, cheap, and durable products. In the commonly used cotton and nylon, we continue to achieve innovative applications of some new fibers and blending applications. The company has a touchscreen, Bluetooth, anti-cutting and other aspects of more than ten kinds of new product patent certificates. Our products are the best on the market. custom fuzzy socks
Post a Comment