Well, here we are to my long awaited smocked bonnet instruction. In the shopping list I gave about a month ago, I said to get white floss. I chose pink for the photos. It shows up a little easier in the pics. So girls here we go. I used two strands of floss.

1.First thing you need to do is count the pleats all that way across. I find it's easier to do when you aren't interrupted. I usually don't do counting of pleats with the tv on, it's too distracting. Also, no kids running around or cell phone ringing. I know most people can't live without their cell phones, but trust me it's not fun to start over the counting process. I just happen to have 161 pleats (hope most of you have even #s). Take that number and divide in half which will give me 80. Now we count one more time from either direction, doesn't matter. When you get the your divided # that will be the center. I've tied floss around the center two pleats. For those of you like me who have an uneven number of pleats, we will be stitching all the pleats except the odd one. You may also want to mark the odd pleat at the end of your row opposite from the side you started on. This way you will not accidently stitch that odd pleat.

2. The blue line that is marked above where the needle is at on the pic is a holding row. Most patterns will not have you stitch on this row. The pleater thread that is just below the holding row is Row 1, that is where we will start our smocking on this bonnet. I usually pull the pleats apart just a little so I can see where the pleater thread is located. Poke your needle through the right side of the center two pleats (remember, I'm a lefty; for all you right-handed girls go to the left side). Stay just above the pleater thread. You don't want to stitch through the pleater thread. It makes it tought to remove them when you are done smocking.

3. We will be doing a row of cable stitches just above the pleater thread. The cable stitch is in my opinion the most basic stitch and probably the easiest too. Notice the thread in the pic is "over" so we are stitching an over cable. Same as my last blog post, don't pull the thread too tight. Easy way to explain is to imagine putting your arm around someone and then walking right next to them. Too loose and you don't stay together; too tight and it starts to hurt. You just want the pleats to stay companionably together.
4. The next stitch is an under cable. Notice the thread is "under". Stitch this over, under, over, under combination all the way across. I happened to end on a over cable.
5. Turn your work over. On the previous row I ended with an over cable, I will start with the same stitch in this row. Also, your floss will be just above the pleater threads. You are probably seeing that I didn't stitch one of the pleats. That was my odd pleat, so I'm not stitching it. You won't even notice after the pleater threads come out.
6. Next is an under cable. Do the same over, under, over, under combination all the way across just above the pleater thread. When you get to the end, turn your work over and continue on the same way you have been stitching. To me the double row of cables looks like links on a necklace and it does look like it forms a hole in the center.
7. Row 2 will start a baby wave. We are starting in the center again, same as the very first row you stitched with an over cable only we are staying below the pleater thread with the needle.
8. Keeping your thread out of the way, move down a row and over one pleat. Notice my needle is just above the pleater thread for this stitch. For doing this stitch think of having boundaries. Your boundary lines are your pleater threads. You don't want to go over these boundaries or you will be in trouble later.
9. Your next stitch is an under cable.
10. Again, keep your floss out of the way and go back up to previous row and stitch an over cable. Continue on with this same stitch combination until you reach the end of the row. I ended the row with an under cable.
11. Turn your work again. Begin with a under cable, then go up to the next pleater thread and make an over cable. Remember to stay in your boundaries.
12. By now you have probably had to use new strands of floss. If you get short on floss before getting to the end of a row (I usually do), poke your needle down between the pleats and knot off on the back.
13. After adding new floss, poke your needle to the side of the pleat where you just ended and complets your stitch. Continue to the end of the row, turn the bonnet and continue on again.
14. The last two rows of smocking will be cables stitches. Follow the same stitch combination as you do with Row 1. You have now completed smocking your bonnet! I'm so proud of everyone. Next week we will be stitching bullions rosebuds.
Again, any questions, please, please, please ask me! I love hearing from all of you. Now I've got to go pleat three bonnets for my class tomorrow. Happy smocking everyone!


 You are probably thinking, "What does this box have to do with smocked socks?" Well, not a thing, but I bought this box a few weeks ago to store all my embroidery floss in. It has a flip top lid that's magnetized. I just had to share this "pretty" with everyone. Now I wish I could have found a pink box, but since a pink one wasn't available, purple was my second choice. Not a bad choice if I do say so.
 1. Turn socks inside out to mark the with a water soluable marker. I've marked little dots to show where the fold line is at. You can just make out the line, but I like to mark this as I don't want to get too close to this line of the cuff with my smocking. I want the smocking to be in the middle of the fold line and the bottom of the cuff once you're done.
 2. Using a 1" acrylic ruler (find in the quilting dept of fabric store), measure down 3/8" from your fold line and draw a line all the way across sock cuff.
 3. You're now wondering why the ruffled sock only has two lines and the purple sock has 3 lines. For beginners I've marked half-space lines 3/16" apart. This will help you to learn the placement of your stitches. One the ruffled sock, I've marked lines 3/8" apart, which are the measurements of a whole space. You can choose to do two or three lines. Both are correct, but very beginner's may want to use 3/16" spacing for their lines.
 4. Continue marking lines all around the cuff. Next we'll talk a little bit about how to get the threads apart from the 6 strands they come in.
 5. First, cut a length of floss. I like to use about 24". If using silk floss, use a shorter length. This will prevent it from getting too fuzzy and worn looking. A length of 24" on cotton floss will allow you to go all the way around most sock cuffs in one shot. Next, grasp the end of the floss with index and thumb. Lightly pounce on the end with other hand. This will open up the floss and allow you to grab ONE strand and then pull. Don't let go with you first hand. Once you've got the first thread out, set it aside and straighten out the remaining floss and do the same thing all over again. Then put the two strands together and this is what you will then smock with.
 You will see in this pic that I am left-handed. So anyone who is also, you will get all the smocking instructions in left-handed format.
 6. If you want a close up, just click on the pic and it should enlarge for you. The ribs on the sock kind of makes a little V, please count this as one pleat. You may need to stretch the cuff a little to see the "pleat". To start, bring your needle up between "pleats". We are going to begin with and "up" cable. Go over one "pleat" the left or right and take a bite with your needle. Notice the floss is laying up (creating a "hill"). And for everyone who is experienced with smocking, you don't need to count pleats on socks. There are always the number.
 7. Pull the thread until it just barely touches the sock. Don't pull too much over your stitch will be distorted and become hidden in the sock. On socks, I've found I have to keep the tension on the socks very loose. The next pic shows what will happen if you pull too much.
 If this happens, just ease the tip of your needle under the stitch and pull on it a little to loosen it up.
 8. Next, go down to the middle line you drew. In the next "pleat" over take another stitch. The needle is paralel to this line. You will have to make sure that your thread is out of your way. It likes to lay in the way of your stitching when doing any kind of trellis stitch. This kind we are doing on the socks it called a "baby wave". And of course, we are doing baby socks :).
 9. The next stitch to make is an "under" cable. Notice the thread is going under (creating a "valley").
 11. When you get all the way around to where you made your first "up" cable; poke the needle between the first two "pleats" and you have now completed your first row of smocking!!!!! Be proud of yourself.
 12. Poke the needle the side and just below a cable stitch. You will notice the thread will trail on the back of the cuff. If you didn't have enough thread to go all the way around the cuff; that's okay. I like to stop between pleats and start on the side of a pleat.
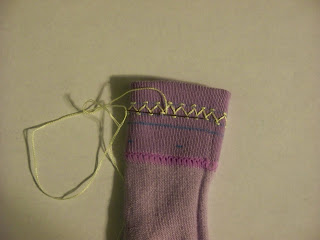 13. Next, make an "up" cable. Then, go down to the bottom line and stitch a "down" cable. All you are doing is repeating the previous row you just made. You will see that a "diamond" shape is created.
 14. Finish up the same way you did on pic #11. Tie off on the back of the smocking with a knot.
